Insert Background Code Here

Hover over an image to Pin It

Showing posts with label Crafts. Show all posts

Thursday, May 8, 2014

What's that Font?

If you follow me, you know I love to get crafty.  I use one of those electronic cutters with some computer software that lets me use any font I have installed on my computer.  If you know me, you will know that I have HUNDREDS of fonts.

I use my cutter to cut out fabric for applique and quilting.  I cut vinyl for decals and I cut paper for scrapbooking.  Cutting out letters in different fonts are probably the number one thing I cut out.

Here's my problem... Going through every font to see which one I like the best is for the birds!

Well..... KUDOS to WORDMARK

Wordmark is an online tool that allows you to see all your fonts.  All you do is type the word in the little square at the top and then click "Load Fonts" and viola! The word appears in every font you have.  The best part? It is FREE!  Visit their ads, visit their page and give them a big thank you!!

I just typed "Jill Dunn" in the little box, and look at that! I am just giddy right now! Gotta go cut out some letters!!

click photo to enlarge

Wednesday, May 7, 2014

Cloth Pads


I understand this post isn't for everyone.  This is not a new idea people...

Women have used these since the beginning of time. (Thanks Eve.)

I just want to make you aware that there are alternatives out there and give you something to ponder.

So, here it goes...
*Cotton is more natural than sodium polyacrylate and dioxin, common ingredients found in disposable pads.
*Most of us own a washing machine.
*Cloth pads are super cute, customizable to person, needs, color, size, shape, thickness, length, material, flow, etc...
*It is your body, take charge of it.

If any of the above statements and/or links didn't convince you to switch or, at least, keep an open mind, read this article. The problem for me is that there isn't enough concrete research on this to "prove" how potentially harmful disposable pads are in order for me to say with certainty that they should not be used.  As a nurse practitioner, I want research studies, evidenced based practice to back up my beliefs, patients who report their stories in a medical journal.  I just can't find any.

Think about this. (Just playing the Devil's advocate here.) Studies are often driven by money, correct?  Well, if millions of women are paying big money for "necessary items," why study something that will hurt that income?  I do hope it makes you think.

However, I did find many, many blogs by women who are so obsessed with cloth pads and the benefits of them, they blog about it! Some rave of comfort and some rave of cuteness.  Some want to save money. Some write about it changing their life; less cramps, less pain, less flow, shorter menses duration. Others just want to put less garbage in the landfill while watering their gardens with the wash waste water (not for me), but whatever blows your dress.

Personally, I think the more natural something is, the better.  If you are having any of the above mentioned problems, research or not, what does it hurt to try?  Do your own experimenting.

I probably should mention that these are also really great for occasional bladder leakage.  I have made some for an older family member who is on a tight budget and she loves them.

If you are worried about dye in the cute patterns, use organic, natural material that has not been dyed. Again, customizable. :)

From researching this topic (reading many, many bogs), here's what I have learned about constructing a cloth pad. You decide what your needs are.

You can use used material such as shirts, wash cloths, blankets, etc. Wash it thoroughly first!
Thorough descriptions of some materials linked here.

There are a lot of styles out there.  Whether you are purchasing or making our own, explore different styles to see what you like and what will best suit your needs. Here's a few from other sites:

(I have no affiliation with these sites.  I'm just trying to put all the info I find into one place for you. There are probably hundreds of sellers out there as well as people who post their own patterns to buy or for free. I have linked these images to their sources as a courtesy to the stores for using their images.  Feel free to post your own links too!)

These, from Luna Pads, have exchangeable pads made separate from the wings held in place with rickrack. You just change out the pad during the day and keep the wings in place. Some designs like this allow you to stack multiple pads on the wings so you can adjust your flow. I have seen this design in square pads also.
Glad Rags have wings that double as pockets and stacking multiple pads inside the wings can adjust the absorbency.
Etsy, as well as eBay, are also a great places to order from individuals and to get ideas to create your own.  A quick search will quickly give you lots of ideas.


The thing to remember is you can customize.  Don't make a hundred pads before you try out the style.

When creating your own, here's the materials that are recommended.  Of course, you can mix and match the materials.  When I made them, I used flannel for the entire wing, top and bottom, with a lining of PUL so the urine would not leak through the pad and/or wings onto her garments.  I was afraid the PUL would be too sticky or hot if touching her skin, so I put it between the flannel. 

Top Layer Materials
Think absorbancy/wicking and softness because this layer is next to your skin
Minky - soft, short pile that wicks to inner layer
Cotton 100%
Jersey
Fleece - wicks through it to absorb it into middle layer (helps keep top dry next to skin)
Flannel
Velour (try for 80% cotton or bamboo in this polyester blend) - wicks and feels dryer than flat fabrics
Rayon
Organics such as bamboo, hemp, linen, ramie
Felt - not as popular, but wicks through and resists stains

Middle Layer Materials
Think absorbancy while attempting to keep it thin, but you can use as many layers as you need
This layer can be removable for quick drying. You can put several middle layers into one set of wings (bottom layer) depending on the style of the pad so you can adjust your absorbancy as needed. 
I suggest trying several styles out and even mixing and matching your materials
Cotton quilt batting - stitch it down to prevent bunching
Cotton  - those holey husband's t-shirts need a new use
Terry cloth - those stained, used wash cloths/towels you don't want your guests to see work well
Sherpa
Flannel - great for liner but may need more for heavy flow pad
Double napped flannel
Microfiber - very absorbent, but may need to be changed often

Top Wing Material
This layer will touch your thighs. Waterproofing this layer adds extra undie protection.
Cotton
PUL (polyurethane laminate) - with cotton or polyester side on top (next to skin) and film between top and bottom wing

Moisture Barrier/Waterproofing (optional)
Added between layers of wings OR behind absorbent padding
PUL
Waterproof Polyester
Naprap
Synthetic fleece or wool - not waterproof, but helps while remaining breathable
Ripstop nylon - harder to sew
Felted wool - not recommended for the dryer
Fleece - high quality (Polarfleece or Windbloc)
Procare - less flexible PUL

Bottom Wing Material
Helps keep pad in place
Corduroy - especially if going "wingless"
Cotton
Flannel - helps keep in place due to "stickiness"
Felt - helps "stick" to undies

Fasteners
Snaps (I am a fan of KAM snaps, but use whatever works for you)
Buttons
Velcro
Tabbed wings - wide tab on one wing that slips into a loop on the opposite wing

Helpful tips:
Wash all material before cutting and sewing
Do NOT use fabric softener, it will make fabric less absorbent
I think the best idea for cleaning I have seen is to take a gallon pitcher or decorative pot with lid filled with cool water and a splash of vinegar, if desired, to toss them in until wash day.

When sewing a pad, the easier the better. I basically took an overnight disposable, traced it, modified it, and cut out a pattern.

I hope this post has given you some ideas. Please feel free to share your thoughts.

Here are some pattern links to get you started.

Tuesday, January 14, 2014

DIY Dress Form

If I were the crime committing type, now would be the time to do it.  I say that because I have no fingerprints left on my fingers.  In fact, I don't think I have much skin left either!

This all started when I purchased my mom an online class from Craftsy.   Hopefully, I'll get a broomstick lace cardigan out of it ;)

It was proving difficult for her to get her measurements correct so I suggested making her own dress form.  I had seen them on other websites.  They range from simple tape mannequins to paper mache masterpieces.

In order to complete the duct tape mannequin I had dreamed up, mom had to run some errands on her own since I was working.  She came across this nice hat/coat rack at a thrift store and snagged it... perfect for the stand.

The next thing was making a tube for the middle of the form.  Since we didn't have a mailing tube, or even a wrapping paper tube, we made our own out of two potato chip cans and a creamer container.
Plenty of duct tape (the good brand) keeps it together.
Next, we dressed mom in garbage bag attire to keep the tape off her clothes and skin.  She was wearing a tank top and leggings to keep the form from being too bulky.
Then, the taping begins.  We crossed her heart (bra style) and kept going and going and going.  Not quite like the energizer bunny (did I mention that I worked last night and I am running on fumes with no sleep).

More taping.  We made sure the shoulders were sturdy.
We taped her neck last since she said she was a little tight in there.  Didn't need an emergency...

 This may just be a new fashion statement.
Now we get to cut it off
 I carefully cut up the back.  She acted like she trusted me.  I tried to be careful not to cut her clothes.  I cut through the plastic bag as well as the tape.  I did have a new skin stapler that I could have tried if I had cut her!
 At this point, she could slide it off her shoulders, but you can cut across the top of the back to get it off if the arms are too tight.
We put the tube inside the form.  The top potato chip can metal end was left in place and a hole was punched in it to attach it to the stand.  We used newspaper and phone books to stuff in the form at this point.
 We tried to keep the tube in the middle of the form as we stuffed, and stuffed, and stuffed.  Did I mention that all the ink was rubbing off on our hands.  Yuck!
 The back seam was lined up and more tape was used to mend it back together.
When we stuffed as much as we could, we cut a piece of cardboard for the bottom and, you guessed it, taped some more.  Now you know why I don't have fingerprints anymore!  Duct tape is sticky!

This is what we have so far... So, it seems as if our mannequin has developed a belly button and it won't go away.
 We had plenty of help... A little too much at times.
 Using this spray foam insulation, we filled any gaps or soft spots we had.
 I had to do this outside.  I just took a box blade and made a slit, put the tube in and filled it up.  I did this in several places.
 You may want to wear gloves for this step.

The spray foam will come out the holes.  Don't touch it!  It will stick to you faster than it will stick to anything else.  Just let it dry on the duct tape and then just pull it off.


 We have one of the pieces of the stand off.  It really will not be this short.
Chloe tries to look cute while we work.

We are getting closer.  We have pulled off the foam that leaked out and now we will tape up the holes made to put the foam in.
 The form is complete, now we just need to make it pretty.
Mom wanted a red dress form.  It almost looks orange in the picture, but it is bright red.  We simply just covered up the ugly duct tape with the red.  The pretty duct tapes don't seem as strong so get a good silver one to do the main form, then you can add the pretty stuff.

It needed a little more dressing up, so we added some pizazz to the bottom with zebra striped duct tape.  Yes, my OCD required me to tape a little inside the potato chip can.  It kind of looks like a magic eye picture.
 This step wasn't absolutely necessary; I just couldn't help myself.
Ideally, the form should be your height so you will be able to gauge how long to make skirts, etc.  Mom will be crocheting and using her form to measure tops while she is sitting, so she wanted it shorter.  That's what makes these so neat.  They fit your needs.
 Tada!  Here it is, naked and cute as can be.  We couldn't cut the top of the coat rack off, but she plans on using the top of it to finish off the top of the neck.
 Here's another picture.  It really looks like it has a belly button.  I don't know how to fix that.
 The form spins freely on the stand.


Monday, January 6, 2014

More Mug Rug Ideas

If you read my last post on Mug Rugs - A Picture Tutorial, you may be interested in seeing some more I completed for Christmas gifts.  If you haven't read it, you're missing out :) I go step by step in the making of your very own mug rug.

Most of the designs are posted to my Mug Rug board on Pinterest.  It should link back to the original web page.  If it doesn't and you are the owner of the page, please let me know so I can link it to you.

It is really easy to take any clip art and use freezer paper to turn it into a design for your own mug rug.


I'd love to see designs you have made!

I am a scrapaholic and I love fat quarters.  I have so many little pieces of fabric, this is a great way to put them to good use.  If you follow my posts, you will notice the same fabrics in several of my pieces.

I made this one for my sister-in-law.  She like polka dots as much as I do and I loved the whimsy little design.

Kissing Birds
Yes, my ironing board is stained (*shamefully hanging head).  Don't look at that :)  I have washed and washed and it will not come out.  I can't find a replacement that fits and I would rather sew for my friends than spend time making a new one.

The apples I designed myself using free clip art from a Google search and customizing the bite mark myself.  My mom (loves apples and burlap) got the apple and burlap and my sister (a school teacher) got the polka dot apple.


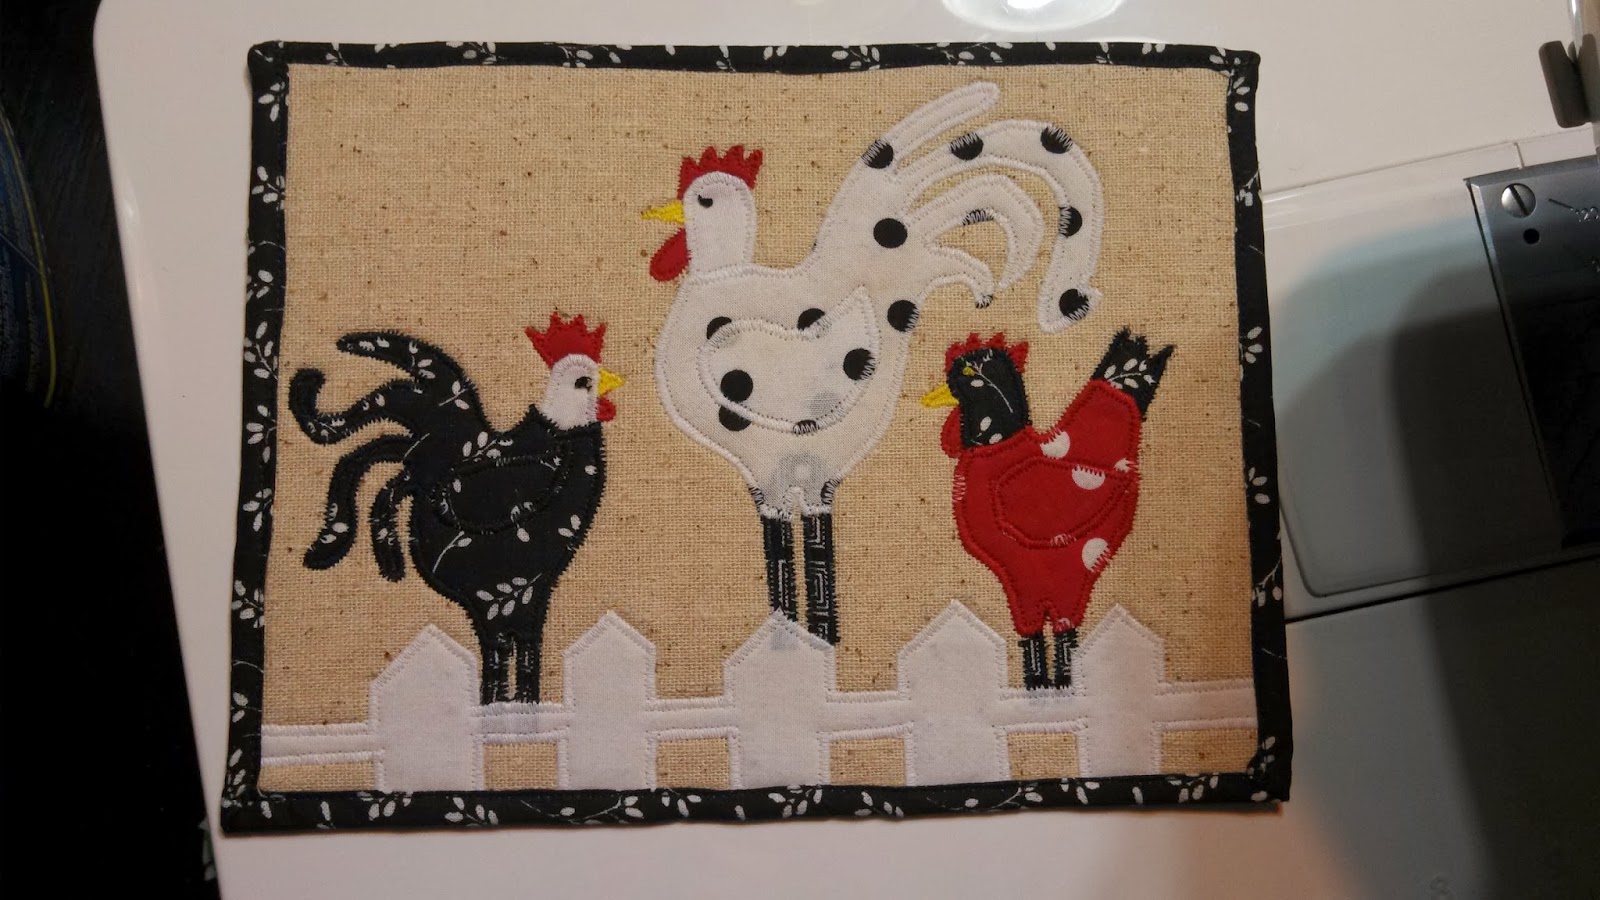
 A friend that likes chickens got this one.  It was fun to make, but very time consuming due to the feathers in the applique design.
Another friend got this one.  She LOVES the beach.  It was a design posted to Flickr and I changed it a wee bit.  You can tell I use the same scraps because one of my ocean waves is the same as the bird above. :)
I loved the hen so much I had to make another one.  This is going to another one of my "country" friends.  I think the hay just makes it.
Do the fabrics look familiar by now?
 I think this owl turned out nice.  I ended up making the black part of the eyes with an eyelet stitch with my sewing machine.
 I did one that was a bass jumping to catch a fly (the fishing kind) and I don't think I took a picture of it (gasp!).  If I find it, or can get the person who has it to take a picture of it, I will definitely post it.

I hope you enjoyed seeing these designs.  They were all really fun to make!

Monday, November 25, 2013

Don't Cut These Apron Strings

If you follow my blog, you probably get an idea that I adore aprons.  I have an earlier post that gives details of National Tie One On Day, which is the day before Thanksgiving.  I've made a few aprons and can't decide which will be the one to give away.  They are all so pretty, I think whomever receives it will be happy to get any of them.

I am not a professional seamstress.   I am learning to sew via YouTube and asking anyone who will listen a whole lot of questions.  Apron kits really appeal to me because I don't have to worry about a pattern or buying and matching materials.  They also seem to be less expensive than buying a pattern plus the material.  Each "kit" can be a different pattern.  I have also started tracing the cut out apron onto paper.  Doing this allows me to make another one by using the first one that I cut out as a pattern (but I still have to buy and match material).

The more I make, the more I learn.  I'm learning to hide some of my seams by not following the directions exactly. 

The very first apron I made, was one I gave to my sister for her birthday.  I didn't have my dress form at the time and my husband refused to let me take a picture of him while he modeled it.  He's a manly man ;)

Here's what it (mostly) looked like.  The printing at the top was a little off, so the collar didn't quite look like a collar.  Nonetheless, it was still pretty.  The flounce at the bottom gave it feminine details that I like.

Domestic Diva by Daily Kingdom
Then, I made this one.  I ended up giving it to a friend of mine who just raved at how pretty it was.  I would like to make another to wear for myself, if I can find another kit.  Apparently, this one is discontinued.  Sometimes the joy we bring to others outweighs discontinued items.

Domestic Diva by Daily Kingdom

If you want to start simple (like no flounce to frustrate you), this next apron is what I would recommend.  I love Emily Taylor designs.  The fabric colors are beautiful.

On this one, I folded the ties in half before I sewed them, as the directions stated.  It made them small, so I decided to try a little something different on the second one.
  

Verona by Emily Taylor Designs
 On the teal apron, I just sewed a hem around the ties, leaving them wide.  The back of the ties are not printed, so I had to fold it pretty to make sure it didn't show in the photo, but I like them wider.
Teal Verona by Emily Taylor Designs
I am not sure who makes this apron.  I purchased it from a shop on Etsy.  It came with a liner for just the top.  I think it looks more like a dress instead of an apron.  It is too cute, but if you wear it as a dress, you'd need to back out of the room ;) I think a hospital johnny would cover up more ;)

Hospital Johnny
Yeah, I think I'm right.

I got a little creative with this one.  I used my rolled hem foot to hem the edges of the bottom and sides (below the ties), which stretched the fabric just a little and gave it some ruffle (only a wee little bit).  It isn't a whole lot at all.  Maybe ruffle isn't the word.  Hrmmm.  That is debatable.  I also decided to line the top with a little muslin.  It is above the waist.   To do that, I used the cut out fabric for the apron as a pattern and just cut it straight across at the waist, just below where the ties go.  I finished the bottom edge of the liner with the rolled hem presser foot (I am getting a 1/4" presser foot the next time I see one).  I then put the two right sides together and sewed around the top of the apron, leaving gaps where the ties go (neck and waist).  I then folded in the seams in the gaps and inserted the finished ties.  I then top stitched around the edges to finish and hold in the straps.  VOILA!
Daisy Kingdom by Springs Creative
If you look closely at the bottom, you can see how the edge flounces just a little due to using the rolled hem foot.

If you are interested in purchasing any of these kits online, I have learned that you have to search several things.  Try these search words:
Fabric Apron Panel
Apron Craft kit
Apron Kit
Cut and Sew Apron Kit

Please let me know what you find and what works for you.  I love to hear from you!