Insert Background Code Here

Hover over an image to Pin It

Showing posts with label FarmLife. Show all posts

Saturday, September 30, 2017

Making "The Farm" Ours

Troy has been after me to blog our house adventures. We have lived on family land all our lives, but we finally branched out, broke the cycle, and bought our own slice of heaven. We started this new adventure in February, 2015. We lovingly call it, "The Farm."

The Farm already had a barn. We just had to make it our own. It was very grown up around.
Troy worked diligently, removing the sweet gum trees that have grown up all the way around it.

Looking better!! The inside is full of the previous owners stuff. We focused on land clearing and cleaning.

Friday, August 1, 2014

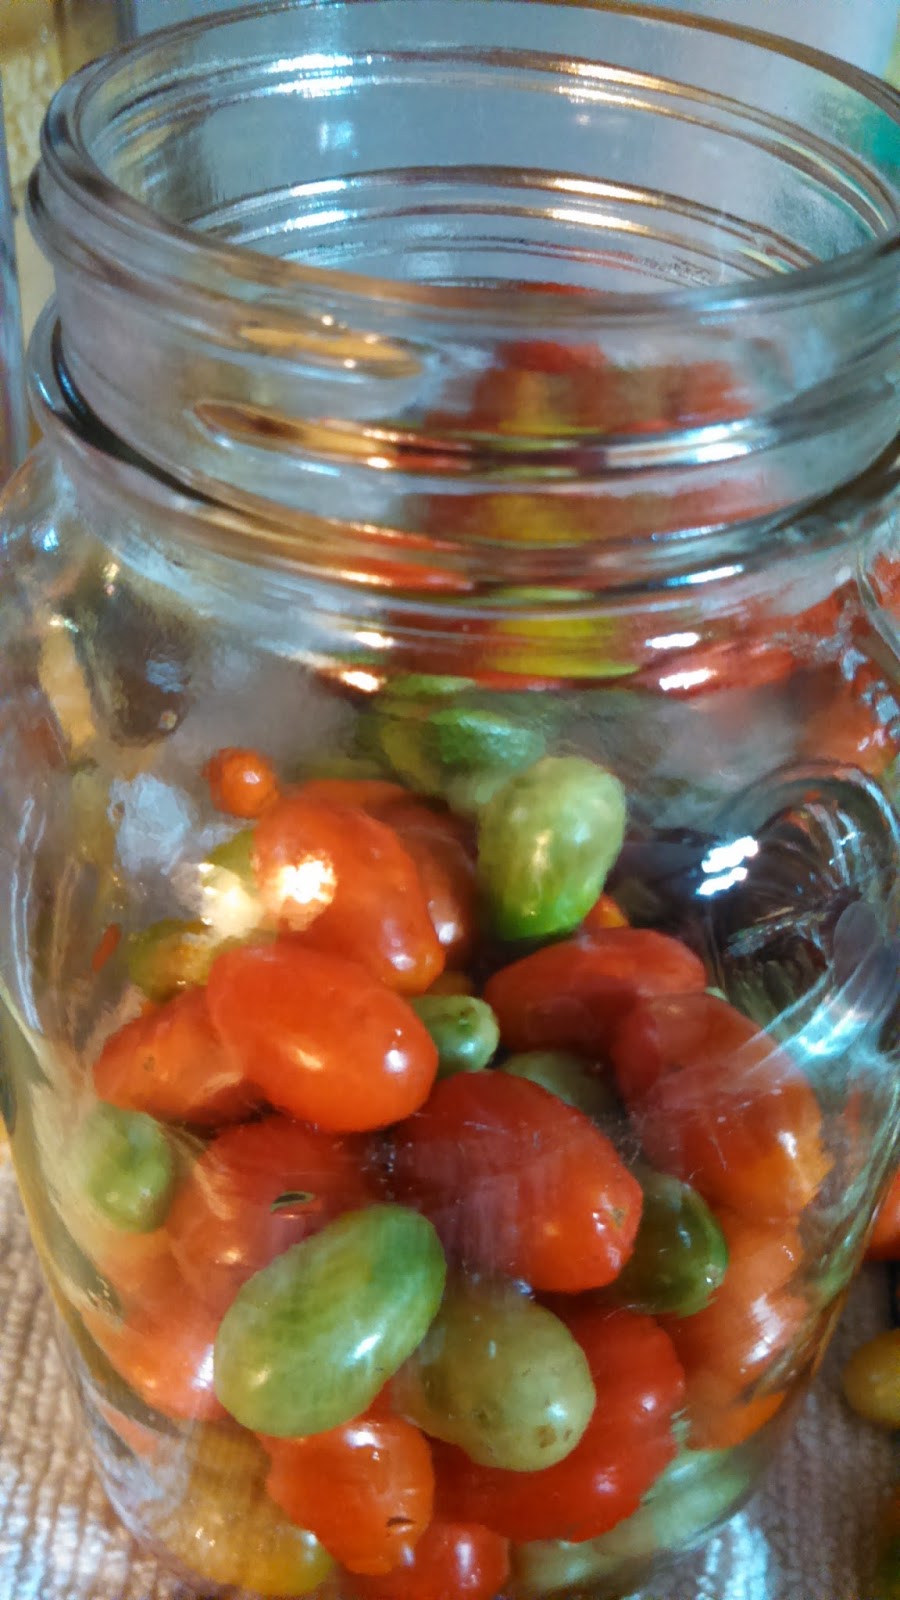
Pickled Tomatoes

Pickled tomatoes. Can you believe it? Yes, I love pickles, but this seems a little over the top, you think? Naaaah... Let's go for it.

My grape tomato plants are working overtime. I'm also a klutz. What do these two things have in common? Lots of ripe and green grape tomatoes that need eating. I knocked a bunch off my plants when I was moving around in my garden and it is not possible for me to wait for them all to ripen. The ripe ones will spoil if I wait.

Searching high and low, I found a recipe that sounded similar to what I was looking for, thanks to Pretty Prudent. Although I followed the recipe very closely, I had to give it my own spin.

This recipe makes 3 or 4 pints, depending on how tightly you pack your tomatoes, as well as their size. You will also get some evaporation during the simmering process.

INGREDIENTS:
1 1/2 Cups Apple Cider Vinegar
1 1/2 Cups Water
2 Tablespoons Pickling Salt
2 Tablespoons Sugar
6 Garlic Cloves, Chopped
6 Whole Peppercorns
1/4 Teaspoon Turmeric
3 to 4 Pints Grape/Cherry Tomatoes - Various Stages of Ripening

TIP: 2 Pints = 1 Quart

Prepare your pint or quart jars by washing in warm soapy water and boiling for 10 minutes. Or, since we aren't canning these, you may use the sanitize function on your dishwasher instead.

Wash tomatoes well and use a skewer or, like I did, a Pampered Chef Hold 'N Slice to poke holes through the tomatoes. I pierced them on 2 sides, going over half way through each time.  The green tomatoes are tough so be cautious and don't poke your hand.


Pack the holey (not to be confused with holy) tomatoes into the prepared jars.

Mix vinegar, water, and seasonings in medium saucepan. Bring to a boil, then simmer for 5 minutes to blend the seasonings. Cool to room temperature and pour over tomatoes.

You may use a fermenting weight to hold the tomatoes down, if you have any that try to float.

Since we are not canning these, I used a plastic Ball storage lid, but you may use a canning 2 piece lid (may be used previously) and band.


Store in refrigerator. I have recently made these, but Pretty Prudent says they will store refrigerated for months.

Wait at least 5 days to a week before tasting. The green tomatoes take a little longer to absorb the seasonings and vinegar. Delicious!

Again, Pretty Prudent suggests using them in salads, pasta salads, cheese plates, relish for burgers and hot dogs, martini and bloody Mary garnish.  I have been eating them right out of the jar, however, they make great garnishes as well as gifts.

I have never canned a tomato with its skin on. I suppose it would become tough. I always recommend tried and true recipes for long-term storage. Recipes from Ball or your local extension office are good places to start. Most tomato recipes that I use require adding lemon juice concentrate (Tablespoon per pint) and processing in a boiling water canner for 45 minutes, which I would think would not give you the consistency you would want in a tomato pickle.

 Good luck!


Friday, July 25, 2014

Shoo Fly, Don't Bother Me

Living on a small farm comes with perks, and pests. Poo, like rabbit and chicken poo will work wonders for your garden, but it sure does draw the pests. House flies love it. They can find it from miles around (I am sure).  What can we do about it? Trap them!

Sure, eliminating the poo would be ideal, but not possible. Besides, my worms would not appreciate it and my plants would not be as green. 

Making a fly trap is easy! 

You will need:
A plastic 2 liter soda bottle
Sturdy tape, such as duct tape or packaging tape
1/2 Cup Sugar
1/2 Cup Syrup - maple, pancake syrup, or dark corn syrup
1/2 Cup Apple Cider Vinegar
Water
Drop of Dish Soap

Easy Directions
Cut the top off the soda bottle at the "shoulders" so it will invert and fit down inside the bottom part of the bottle. Kitchen shears work great. 

Mix the sugar, syrup, and apple cider vinegar in the bottom part of the bottle. Stir well until all ingredients are dissolved.

Add a drop of liquid dish soap.
Invert the top of the bottle and place on the lower portion, lining up the cut areas. 

Use tape to secure all the way around. Do not leave any gaps. Carefully add water to bring the liquid level up to about 1 1/2 inches below the opening of the bottle.

Place your trap in areas you have fly problems. 

When full, or just extremely gross, toss/recycle and make another. 

Some of the liquid will evaporate, as you can see in the picture. But, how gross is that?

Sunday, May 4, 2014

I found a really cool blog about soil cube makers.  I am really interested in this and I want to learn more.  Until I can blog about it, here's the link... Daily Bread Living

Soil cubes are are little blocks of soil used to start seeds.  The roots air prune themselves, as long as the cubes are not touching, then the roots can grow into the cube beside it.  It is easier on the plants because there is no root shock when transplanting.  You don't have to peel the bottom off the containers that decompose.

From my various readings, to make soil cubes, you simply mix water with your seed starting soil until it becomes the consistency of oatmeal. I am not interested in using peat, since it is not considered a renewable resource. 

Soil cube makers can save you money since you can use it over and over.

Maybe I will be able to post a tutorial later.  I have tried to contact Daily Bread Living's blogger for more information.

I'll call this entry: To Be Continued...

Photo from http://dailybreadliving.com

Thursday, May 1, 2014

Don't get ticked off... Get the ticks off!

It is a silly title for a not so silly topic. Ticks are not just gross, they can also be dangerous to our pets, as well as us. We have outdoor dogs and no matter what prevention or remedy we try, they still get ticks. I cannot touch them! That is why I got married. Having a handsome, manly man around to do that job is the way to go!  However, my manly man works, so it isn't always possible to have him do it.  I can't stand to leave them attached and alive.

Today, I noticed a very big, blood sucking, disgusting tick inside my dog's ear.  It was one of those that got bigger with each gulp of blood.  Like a balloon from a horror movie. What to do?? I had to take matters into my own hands.

I remembered something about cutting a "v" into the end of a plastic spoon and scoop the tick into the slot to make it come out. I tried that and it worked, but not as well on all the ticks.

I also remember, as a teenager, arriving at the home of the boy I used to babysit just to discover his mom holding a pair of pliers with blood droplets all over them and the front of her shirt.  Do not try to remove these balloon ticks with pliers! They explode!

I opted for my own reinvention.  Grabbing a plain, disposable plastic fork and my kitchen shears, I went to work. I turned this...


Into this...


I suppose I could have left the tines long, but the tick was inside the ear and I couldn't get it into the end of the "v" of the tines. Now, all you have to do is catch the little blood sucker between what is left of the tines and keep pushing it toward the bottom, or the "v" of the tines... Continue on until the tick pops out. It worked great!

I purposely cut them at an angle. It gave me different slot sizes to choose from.

I couldn't get it to work on the flat ticks, but those are okay to grab with the tweezers, before they get engorged.  Just be sure to grab them in the head and not the body. If you squeeze the body, you can make them expell bacteria back into the dogs skin and cause infection.


So, what do you do with the ticks you remove?  If my dad has visited and he pulls it, he tosses it to a chicken.  Problem solved. If removing several, I may get a little cup of bleach and drop them in as I remove them. If it is one big one, I have been known to flush it (picture a huge sewer tick coming back for revenge).  When the ticks are flat and I just remove one, I pinch it between tape and toss it in the trash. This method works well with fleas too.

Saturday, April 19, 2014

This isn't your ordinary trellis

I have taken a semi-vow not to plant anything I can't eat. That is why I have food growing in my flower bed :). The vow can't be a full-blown vow, because I can't part with my orchids. Are they edible?


I love whimsy. I love having fun and finding things that are out of the ordinary. When I came across this metal dress form while "junking" with my sister-in-law, I knew I had to have it for my garden.  I planted some melting sugar snow peas and they needed some support. I thought, "Why not?" and went with it.
 Placing the form where I wanted it, I made a line in the dirt as a guide for planting. I planted the peas where they would be just under the back of the form. I then placed the form on top and used two electric fence posts to support the dress form, securing them together with zip ties. I should have painted the orange posts black, but didn't have any paint on hand.
This is how it turned out.

 Cute, huh? I hope to add some updated pictures as they grow and let you know if this is as practical as it is cute. Please share your ideas too!


Sunday, February 24, 2013

Worm Tower

So I decided my raised bed (we call them garden boxes here in the South) needed a source of natural fertilizer. We already use vermicompost from our two Worm Factory bins, but thought having the actual worms in the garden box would be better for the soil due to the worms basically being "little tillers" and making the soil nice and aerated.

There are many ways to make a worm tower. Many people use food grade PVC pipe because it is easy and all you need is an upside down  flower pot for the lid.  I prefer the wooden one (untreated wood) because I think it looks better.  I also think the wood will have some insulating properties; it gets pretty hot here.

I have to thank my husband for helping me and not once complaining. He's the best!

Keep in mind that these measurements are ours and don't have to be exact. Use what you have. I have seen some that are really tall and others that are made of short pipes.


First, we cut out 4 sides that were 22" long. I'm working at my kitchen table because it is storming outside.
Be sure to use outdoor wood glue on the edges before screwing your boards together.
Next, we put them together in a square. Notice there are screws visible on only the left side of the box due to the way we stacked it. This will make it stronger.  Also, notice we turned the wood grain to where it is cupped  to the inside of the box.


This is my trick for finding the center of the board when I have to attach the sides.  I am excellent at getting too close to the edge and missing my board or going in so close that the screw sticks out the side. Not anymore.
See. The screw went in and is in the center of the board that you are attaching to.
You may not need this step, but it works really well for me.

Drill pilot holes so you don't split your wood.
We used deck screws to attach the sides.
This is what it looks like at this point.  Now we need a lid and a vent hole.
I used a 1/4" spade bit to drill a vent hole in the center of one side near the top. This just lets warm air out.
The exact size isn't important. You can even use a small bucket or terracotta planter saucer as a lid. I like the wooden one because I think it looks better. The blocks are 4 1/2" by 1 1/2" and are used to keep the lid from falling off.  They also add a little extra weight for those extra windy days.  If you are extra creative, you can use a router to make the edge more decorative.
To drill your hole to attach the nob, you'll need to find the center of the board.  Just use a ruler or other straight line and draw from corner to corner, making an X in the middle. That's the center of the board.  Drill a hole for the nob in the middle.
 
X marks the spot.
Follow package directions on attaching the nob.  We used a wooden drawer pull.  You most certainly can use ceramic, but keep in mind it will be outside and will be in the sun and rain (not much sleet and snow here).

After drilling your hole. Attach the blocks to the underside of the lid. Make sure to use some more wood glue.
Now it is time to drill some holes so the worms will be able to get out and go into your garden to leave their precious black gold in the soil and be able to return for dinner.
I used a 1/2" spade bit and drilled 15 holes in each side. The placement is not important. Remember, this part will be in the ground so nobody will see it.  Worms don't have eyes so they won't care either.  Just make sure you have plenty of holes and they are big enough.  If in doubt, go bigger, or at least a lot more smaller ones. 
Yes, there was saw dust all over my kitchen.
Here's the finished worm tower. Ta Da! The way you use it is you place it in your garden or garden box by burying it in a hole making sure all the holes are underground.  place some moist shredded newspaper in the bottom with a handful of composting red worms. I got mine from Uncle Jim's Worm Farm.  Then, you feed them your kitchen scraps.
To finish it, we are using boiled linseed oil, which is not toxic but will help preserve our wood.  It won't last forever, but it will slow the rotting process.
 There is a wealth of information online.  I encourage you to read Feeding Your Worms
There are many articles out there that will give you plenty of advice.

A few tips from me:
  • Use citrus and peelings in moderation, the more acidic foods you add, the more base (eggshells) you need to add.
  • Worms LOVE corrugated cardboard.  They lay their eggs in it if it is near food. However, I don't think it should go in a worm tower because it takes too long to break down.  The whole concept is to get the nutrients out into the garden and not build up castings in the tower. 
  • Never put meats, oils, or dairy in your vermicomposter or worm tower.
  • Put your weeds from your garden into your worm tower. Serves them right. How dare they grow in your garden.
  • Use lots of worm towers. Flowers, as well as food gardens love worms and their castings.
  • Eventually, you will have to move it around.  When you do, keep it "within reach" of your established worms in the garden so they can use it again. Unless you have an established indoor vermicompost system, then you can just add worms you already have or just buy more. 
Here's a great picture on how the worm towers work.
I actually made two of these (one for a friend). She wanted to paint the top of hers while I wanted to leave mine natural. Mine (on the left) is covered in boiled linseed oil all over.  I covered hers on the bottom and on the entire inside for protection.

Saturday, February 18, 2012

Cool egg

This is not a regular occurrence with our hens. The brown area is rough. As you can see on the end of another egg, I use a pencil to date them so we always have fresh eggs :)

Sunday, February 12, 2012

Jaguarundi - at least that's what I'm told

Another reason to worry about my free-range flock.

In South Alabama, we see bobcats quite frequently, but there's another cat out there that dodges the wildlife cameras quite frequently.  The biologists tell us it isn't a panther, but a jaguarundi.  Whatever it is, I don't want it anywhere near my chickens. 

Thursday, November 3, 2011

Mamma Hen

Look close. She has extra feet ;)

White Silkie

Bug Snack

I had to get out of the car to investigate the thumping sound I heard while parked in our yard.

It was only the chickens pecking the bugs from the front of the car.

Saturday, August 21, 2010

Eggs!

I wash my eggs. It is said that if you leave the bloom (protective covering that dries on the egg when the chicken lays it) on the egg, it will last longer. I refrigerate mine, so I'm washing them.

I use warm water. If you use water colder than the egg, it can actually draw bacteria into the egg. I also use a potato brush to remove any visible dirt that doesn't rinse right away.

Bountiful Harvest


Sent via MOTOBLUR™ on Verizon Wireless

Tuesday, July 13, 2010

Naked Larry Update

Naked Larry is doing much better! He has most all his feathers back and is slowly becoming more attractive to the ladies. There are 3 hens that are hanging out with him now.  He contines to be kicked off the roost in the coop, but seems happy perched on the side of the nesting box.

Sent via MOTOBLUR™ on Verizon Wireless

Tuesday, June 22, 2010

SNAKE!!!

The other day I was going outside to check the chickens and gather eggs. My hens were not happy. So, I walked inside the coop and there was a 5 foot long chicken snake eating my eggs!!! I am not kidding. It was 5 whole feet in length! I have no idea how many he ate, but I was not happy that he was there. My hero, aka my husband, took care of the snake for me, but I am extra cautious now when I walk out there. I'm just glad he didn't get one of my chicks!

Sorry, I didn't take a picture of it. I was totally disgusted.